
When a fiber optic connection is broken, we all know that fiber optic tester like visual fault locators or OTDR can help to find out where problems may occur and solve the problem. Then, what if a problem occurs in Ethernet networks? It’s time to use a network cable tester. This article is going to give a brief introduction to network cable tester and how to use as well as some abnormal connections that may appear in the testing process.
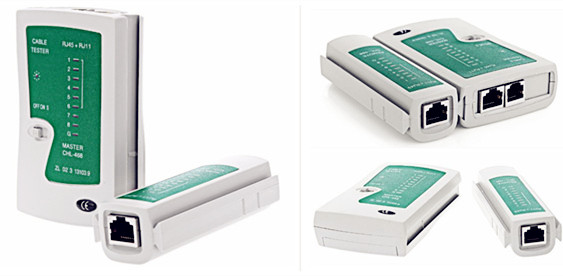
A network cable tester is a device that can identify whether the wires are paired correctly and whether there is a break in the insulation which allows cross-talk between two wires. It even can tell if the cable has the proper level of resistance. Here is a picture of network cable tester shown below. It consists of a main tester (also called master tester) and remote tester. There are night lights on the front panel of them. Besides, most testers have either two or three connectors: RJ-45 for Ethernet, RJ-11 for telephone cable, and BNC for coaxial cable. When testing a Cat5e cable, the two testers are connected by the Cat5e cable. And if the cable works, the lights on both testers will become green sequently from 1 to G. However, if using the tester to test cable with RJ11 connectors, the shining sequence of lights will be different.
Network cable tester can test two common types of cable: coaxial and twisted pair. A basic network cable tester may only test simple connectivity issues but not identify other problems that cause fiber failure. Generally, if a network doesn’t work normally, the problem frequently lies in the user errors or other sides. It rarely is a faulty cable.
Network cable tester can tell if the Ethernet cable is able to carry a signal when connected to it. Then, how to use a network cable tester to check a cable correctly? Since there are various types of network cable testers in a number of different forms, here is just a simple guide on how to use it.
Notes: never connect a cable tester to a live circuit. Before starting with testing, keep in mind to remove the cable from computer or router.
Step one. Connect the testers. Connect the main tester and remote tester with the cable you want to test. Make sure your cable is plugged in fully and correctly.
Step two. Start the test. When you are ready, turn on the button to send a signal up the cable, which lights up the LEDs on both testers. If something has gone wrong, the red lights will on. Then you need to check your test process or cable carefully.
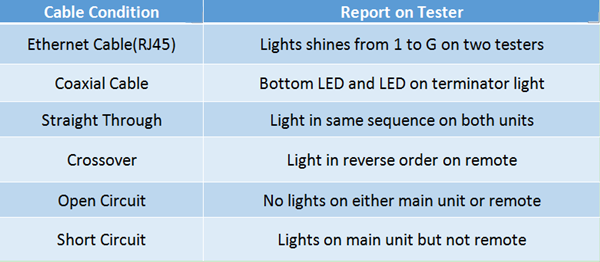
Step three. Read the test report. The different lights shine and the sequence of lights on shows different problems. Here are some common results you may encounter during the testing process.
Besides, here are some abnormal connections that can help you to use a network cable tester effectively.
- If a cable is short circuit, for example No.3, then the two No.3 lights on both testers will not be on.
- If several cables are not connected, several lights will be off respectively. If less than two cables are connected, none of the lights is on.
- If two ends of a cable are disordered, the lights on testers will shine in different orders.
- If three cables are short circuited, none of the corresponding lights is on.
The network cable tester is designed to calculate how well your high-speed network cables are performing. Poor performance in these cables can result in damage to work, poor Internet access, and general disruption to the network. There are a number of problems which can be sorted out by using the network cable tester, and it will certainly help you to save time trying to find software or hardware solutions.