
Fiber optic testing in optical communication is an extremely important procedure. Whether installing new cable or testing existing cable, fiber optic testers such as vision fault location, OTDR and optical power meter, are the necessary part that cannot be ignored. This tutorial mainly focuses on the introduction of optical power meter.
Optical power meter is a common testing instrument. It is often used to accurately measure the power of fiber optic equipment or the power of an optical signal passed through a fiber cable. Sometimes technicians may also use it to measure the power loss of signals. An optical power meter is made up of a calibrated sensor that measures amplifier circuit and a display. The display can show the measured optical power and the corresponding wavelength of the optical signal. The following figure is an example of FSOPM02 handheld optical power meter.
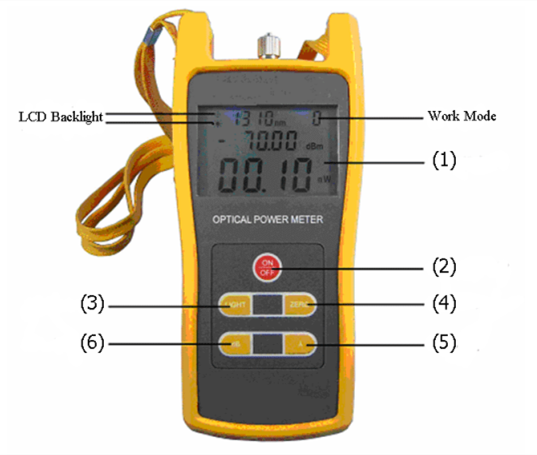
Here is a simple function explanation of the optical power meter.
(1) LCD: display the measurement tested, the selected wavelength, the current operation situation and so on
(2) ON/OFF Key: control turning on or off
(3) dB Key: choose the display unit
(4) ZERO Key: press this key for 3s then enter into zero calibration procedure
(5) “λ” Key: choose different wavelengths
(6) LIGHT Key: turn on or off LCD backlight
Before using an optical power meter, we should do several preparations. First, getting familiar with the function of each button. And it’s better to do some practice tests before going to do testing works. Second, make clear that how and where your fiber cables are installed in case of unnecessary problems. Last but not least, remember to take notes of your testing results. Besides, it’s important to follow safety notes while doing testing with an optical power. After you have done all the preparing works, it’s time to start the testing tasks. Here are the steps.
- Turn on the optical power meter and press the λ key to choose the wavelength to be tested.
- Turn on the emitting source and select the tested wavelength, waiting for a while until it becomes stable.
- Connect the light source (emitting source) to the optical power meter using the fiber cable that is as same as the fiber under test.
- The optical power meter gets the power measurement value. This value should get close to the tested one.
- Press the dB key, the reading figure will be shown on the screen. The tested power value will be set to the reference one.
- Do not cut down the connection between the emitting source and the light source. Then connecting them to the optical fiber link respectively. The reading in dB unit shown on the screen is the tested optical fiber link loss.
Notes: all the connectors and fiber ends should be cleaned with alcohol to ensure an accurate testing result.
Most fiber optic testers are the instruments providing precise functions for technicians. Therefore they need to be used and maintained properly. Here are some tips for optical power meter maintenance, which should be paid attention to.
- All the connectors and surfaces should be free from oil, dirt or other contamination to avoid damage and to ensure an accurate result.
- Dust proof cap should be used to avoid scratch or contamination when optical power meter is not in operation.
- The light interface is very sensitive, so the connectors should be carefully plugged in and out.
- If the optical power meter does not need to be used for a long time, it’s better to take out the battery.
In a word, optical power meter can be used for both optical power measurements and relative loss measurements. Using it properly can help evaluate the quality of fiber optic links transmission. And now on the market, there are different types of optical power meter such as standard type and multifunctional type. Different types have different features. Selecting a suitable one is helpful for a right and reliable cable connection.